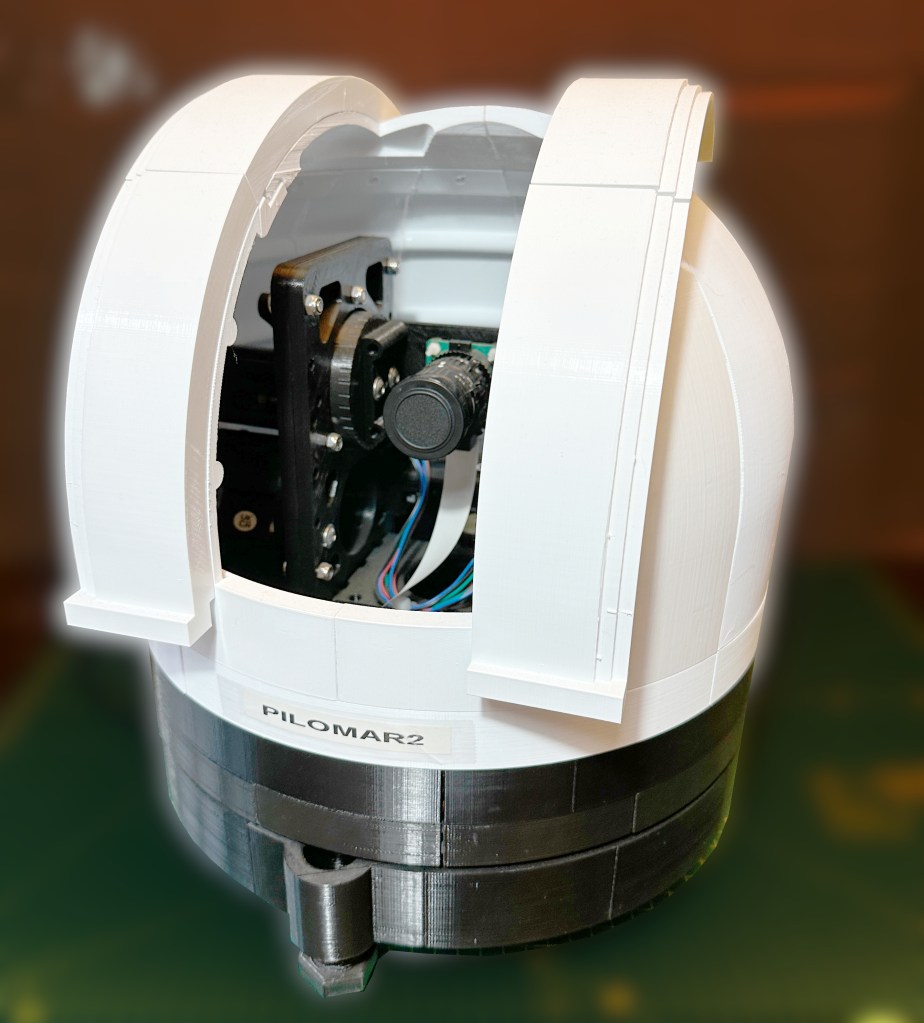
Done! Finally published the telescope project on Instructables.
https://www.instructables.com/Pi-lomar-3D-Printed-Working-Miniature-Observatory-
That took a lot longer than I expected. If you want to really learn something, try to teach it. Writing and recording simple instructions for making the telescope meant revisiting every piece and stage of the project. Of course, there’s always something to improve whenever you look at even the tiniest element of the project.
So the published project is more accurate, more robust and more repeatable than the first version I made quite some time ago now.
If you’re interested in the code for it, that’s available on github.
https://github.com/Short-bus/pilomar
The published code is a simplified version which just focuses on the camera and motors to capture the images. I’ve another copy of the code which is more filled with experiments and development features. If I get a good winter of observations done this year, no doubt some of the new features may make it into the published project too.
There’s a first draft of a manual in the github repository too, it’s a .pdf in the /docs directory. This is for my benefit as well as anyone else!
If you’ve been waiting to see how I built the original telescope that was revealed on X (was Twitter) a couple of years ago then this Instructables project is the place to look.
What next?
I’ve a list of possible developments to make which I think will now roll forward into a ground-up rebuild for a slightly larger system.
The new Raspberry Pi 5 minicomputer supports 2 cameras now, that’s really useful in this project. I can have 1 camera dedicated to tracking while the other is dedicated to capturing the images for stacking. The two cameras can use different lenses too, so tracking can be wide-angle – which works best, and the ‘light’ image capture camera can be longer focal length.
The next version needs to be more portable. It’s possible to run the current one out in the field if you have enough extra bits of kit, but it could be vastly simplified.
I don’t know if it’s practicable to make it properly weatherproof, but I’d like to investigate that a little more too. I suspect the complexity and cost may kill this option, but it would be great if it could sit out permanently to make most use of the occasional observation opportunities that the cloudy UK provides.
I experimented with live stacking of the images a while back, although I got close, it wasn’t a perfect solution. However as the Raspberry Pi power increases it may be possible to implement one of the open-source live-stackers directly on the RPi and just feed images directly into it.
There were several dependencies in the project which restricted me to a legacy Raspbian OS, and most of the packages it uses are limited to specific versions. With the RPi 5 it would be time to upgrade to the latest O/S if I can get all the packages available again. This would also be the time to switch to libcamera and rework the camera handling to streamline it further. There is noticeable time lost in overheads at the moment using the original camera utilities.
I’m trying to decide whether to continue with the ‘remote UI’ that the published telescope works with, or would it be better to rethink that completely. Either a web UI that could be accessed via a smart phone, or perhaps just a small screen and keyboard sitting with the device to keep the complexity down. I don’t like having to rely upon the home wifi network, it causes occasional problems.
It would be great to make the resolution of the motors even finer, but I think I have to completely rethink the design for that. It probably needs a few experiments to decide which way to go with that. Switch from gears to belts? Convert from Alt-Az to Polar? Polar adds significant structural complexity I fear – but improves image alignment.
But for now, I’ll just compile a wish-list of new features, and spend the winter using the current telescope as it is.
In fact – I have 2 at the moment. The original one (with some tweaks) and the latest version that I built for the Instructables project page. Hmm…. what to do with TWO running at the same time?


I really love this project. I’ll be keeping tabs on it and intend on building one. I like the idea of the web interface. I might try throwing one together as a fun side project. Are you familiar with the OpenAstroTracker project? If not, I thought it might be interesting to you. I also saw Arducam has developed a 64MP camera but unfortunately without interchangeable lenses. Very cool but wouldn’t work here. A ~20MP pi camera with interchangeable lenses would be great for this, inching closer to a DSLR. I’m curious if something similar could be assembled from components that would work with the pi. OpenAstroTracker does something like that for a focuser addon.
LikeLiked by 1 person
Hi George, thanks. The attention has surprised me a bit! I hope it helps or inspires others to do something similar. I just figured there were a few useful elements and problems solved in my project which may help others. Plus if I publish the instructions – they are available for me too if I need ’em again!
The camera issue is quite a wide topic isn’t it.
Arducam do a version of the RPi HiQ sensor with the IR filter removed. That’s tempting to try. For some reason I’m nervous about hacking the IR filter off my current HiQ sensors – but it’s gotta be done I guess.
Lenses are another can of worms. The C/CS lenses don’t appear to be the finest optics in the world – but they are cheap! So I’m interested to switch to a regular SLR lens in search of even crisper images.
I’ve seen at least one GOTO project which mounts the whole SLR too.
Another option may be to mount a modern smart-phone – some of those have useful resolution and zooms these days. You maybe also get enhanced images with AI….
Haven’t seen OpenAstroTracker, I’ll have a look, thanks for the tip! Ideally I need to avoid reinventing solutions that already exist and would work with this project. With the new Raspberry Pi 5 supporting 2 cameras simultaneously it may take tracking in a whole new direction for the next version.
LikeLike
You’re welcome! The portable, all in one nature of the design inspired me to try and get back to astrophotography. I built the OpenAstroTracker but it’s a lot to move around so I’m less inclined to use it more frequently. Your design looks great for easier, quicker sessions when that is what I’m looking for.
The search for crisper images is what got me looking at the other camera modules. I feel like it must be possible to use 3d printing to combine a DSLR lens (or other type of lens) with an imaging sensor to create a low cost setup somewhere between the raspberry pi camera and a DSLR.
The project of a GOTO that mounts a SLR sounds a lot like OpenAstroTracker, maybe that was what you saw.
I had been thinking about the smartphone as well. If they had some kind of external control, it could be very useful. As I’m writing this now, I’m wondering if a custom Android app could be created to interface with the Pi and the imaging could be handled that way.
Very curious to see where you go in the future, looks like a great project. Like I said, hopeful to build one soon. Just need to grab the components.
LikeLike
I’ve been contemplating an open source telescope project using a Dwarf II but their UI and interface doesn’t really allow for that.
Then I saw this project, which is MUCH closer to what I’m looking for, although it seems to be a “take it out, set it up, take some pictures, and haul it back inside” type of operational philosophy. I’d rather a “mount it on the roof and connect to home wifi to open, select, shoot and close up” philosophy.
For that, I’d have to modify the dome, in particular, to create a secure, weather-proof style covering, not the open slot type in the Instructables.
To that end … a dual layer set of 1/2 domes, where a pulley or motor moves the inner 1/2 out of the way to shoot, and pushes/drives it back to seal up the dome when done, would seem to be an option.
Likewise a segmented collapsable dome that rotated up out of the way and could then be pulled pack in place to protect the scope and electronics might work.
I was also thinking of moving the RPi board and electronics to a watertight case under the main rotational ring to better protect them.
I’ll see what I can come up with.
Also, I have a SnapMaker A250 printer, with a 250 mm x 250 mm board, so I may have to “adapt” some of the DTL files.
LikeLike
Hi, great ideas, it would be fantastic to see how you develop it. Everything is up to you with the design. It may be that just the software and the motorcontrol system may be of interest in your case. The physical dome and even the actual gearing can be done in other ways. The UI on this one is character based at present, very old fashioned, but works well enough over remote connections.
I have to agree, a telescope fully weatherproofed and mounted outside would be ideal, I have dreams in that direction too. I’m also considering shifting the electronics into a separate box together with the power supply, you then just route the camera ribbon and motor wires into the dome.
I wasn’t sure how to weatherproof the moving parts without introducing friction in the current design, but you are right, making the waterproof covers an extra layer may be a good way ahead. The dome is partly cosmetic, and partly to act as a shield against dew and stray light, lots of alternative designs possible there.
If you need extra motors on a more advanced structure the motorcontroller could expand up to 6 motors in total with only minor changes. There are lots of spare GPIO pins available still on the RPi too. I can think of 3 extra motors needed in the most ambitious ideas I have for the future.
If it’s permanently mounted outside, it may be wise to look at adding some way to check the calibration/positioning of the camera, the current one uses dead reckoning which is accurate enough because you can easily check the setup each time you take it outside. I’ve a couple of Adafruit orientation sensors on my desk waiting for experiments in that direction.
A 250x250mm print base should be fine for most of it, I think the dome sections and that big cog in the foundation are the largest pieces and I think they’ll fit. You could avoid the printed cogs and gears entirely by switching to belt and pulleys instead.
I’m hoping everyone who builds a telescope improves upon my design, your ideas sound great.
LikeLike